Wednesday, May 07, 2008

EDGE/GPRS in Leopard

Here I'm going to show you how I configured my Nokia 3110c Phone as a EDGE modem with my MacBook in Leopard (10.5.2).

Go to System Preferences > Network. Click on the Bluetooth section, initially it will be empty.
Select Setup Bluetooth Devices. In the new window, select Set Up New Devices.

In th Device type, select Mobile phone.

Bluetooth Setup Assistant will try to find your mobile phone, be sure to turn on Bluetooth on your mobile phone too. After your phone gets detected, select it and press continue.

Insert the paring key in your mobile phone.

Be sure to check the two boxes in the next section.

Now comes the modem setup for your phone. I chose Nokia from Phone Vendor, and GPRS from Phone Model, and in the APN section gpinternet. You can put any username and password in their respected field. Check all the other options as described in the picture.

If everything goes well, you should be seeing a new entry in Bluetooth section in System Preferences.

Now we go back to Network section and again select Bluetooth from the left pane. In the Telephone Number field put *99***#. And provide the previous Account name and password. After clicking on the apply button, just click on connect and keep your fingers crossed.

It won't take more than a couple of seconds to establish a connection. You should see Status: Connected by now.

You can connect to this EDGE/GPRS modem from the menu bar directly from now on. Just Click on the Phone Icon in the menu bar and then click connect.

Monday, April 21, 2008

Tips: Enabling Eclipse Style Code-Sensing In Xcode 3

By default code sensing is disabled in Xcode 3. Here is how you can enable that with Some Eclipse Flavor (another of my favorite IDEs).

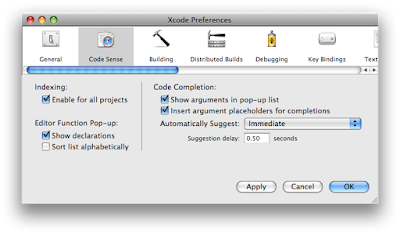
In Xcode, go to preferences > Code Sense and Make sure "Immediate" is selected in "Automatically Suggest" drop down list.

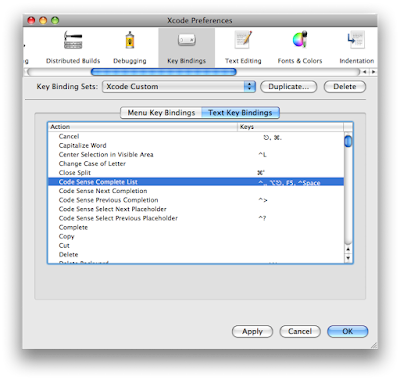
Now go to key bindings and add Control+Space for (^Space) "Code Sense Completion List".
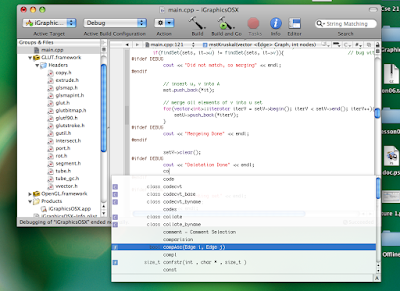

Now when you code, just press Control+Space for a list of possible functions and variables.

Monday, April 14, 2008

Booting Ubuntu with Vista Boot Loader

Make sure you have grub installed in the same partition as the Ubuntu, not in MBR. Now boot into any linux Live CD and do this:

$sudo dd if=/dev/sdX of=ubuntu.bin bs=512 count=1

Here X is the drive number where ubuntu is installed. Now copy the ubuntu.bin file in your Vista's \Boot folder.

Now boot into Vista and run bcdedit.exe as administrator.

C:\Windows\system32>bcdedit.exe /enum


will show you current entries in the boot menu.

C:\Windows\system32>bcdedit.exe /create {legacy} /d "Ubuntu Linux"
C:\Windows\system32>bcdedit.exe /set {legacy} device partition=C:
C:\Windows\system32>bcdedit.exe /set {legacy} path \Boot\ubuntu.bin
C:\Windows\system32>bcdedit /displayorder {legacy} {current}


Now reboot the system and see the new entry in the boot loader.

More detailed info can be found here.

Tuesday, February 05, 2008

EDGE/GPRS via Bluetooth

After buying a new Nokia 3110c thought to give a try to connecting to EDGE internet via Bluetooth. I personally use Grameen Phone's gpinternet package. In this how-to I'm going to to show the whole procedure.

In Ubuntu 7.10 Bluetooth service should be on by default. So just check for the device

$sudo hcitool scan

It showed my Nokia 3110c

Scanning ... 00:1D:FD:36:9E:DB Nokia 3110c

Note down this ID, we'll need that later.

If the command does not work for you, you need to manually start the Bluetooth service.

$sudo /etc/init.d/bluetooth start

Now we need to edit some configuration file ...

$vim /etc/bluetooth/hcid.conf

Just make sure these lines are in that file

options {

autoinit yes;

security auto;

pairing multi;

passkey "1234";

}

device {

name "%h-%d";

class 0x000100;

iscan enable; pscan enable;

discovto 0;

lm accept;

lp rswitch,hold,sniff,park;

}


Now we need to insert our Bluetooth phones ID into another file.

$sudo vim /etc/bluetooth/rfcomm.conf

rfcomm0 {

bind yes;

#Insert your device ID here
device 00:1D:FD:36:9E:DB;

channel 1;

comment "Nokia 3110c"
}


Time to prepare our Dial-up connection


$sudo vim /etc/ppp/peers/gpinternet


/dev/rfcomm0 460800 connect '/usr/sbin/chat -v -f /etc/ppp/chat-gpinternet'

crtscts

modem -detach

noccp

defaultroute

usepeerdns

noauth

ipcp-accept-remote

ipcp-accept-local

noipdefault


We'll need to edit another file, this file will contains service provider specific modem codes

$sudo vim /etc/ppp/chat-gpinternet

'' ATZ OK AT+CGDCONT=1,"IP","gpinternet"

OK "ATD*99***1#"

CONNECT ''

Everything is done, just fire up the modem.

$sudo pppd call gpinternet

It will ask you to enter some pass code for the pairing, after that dial-up connection will start and you can browse with your modem.

Wednesday, December 19, 2007

File sharing between MacOSX and Ubuntu in Parallel Desktop 3

I had been using Parallel Desktop for running Windows and Ubuntu Linux in my MacOSX Leopard. Windows support is really very good in Parallel Desktop taking into account the coherence, clipboard and all in one file sharing options. Unfortunately, coherence is not supported under Linux and no straight forward way for file sharing. Here is a way that I figured out after fiddling with Parallel for an hour and it works prettly well for me.

In Leopard, System Preferences > Sharing
Turn on File sharing. Add as many folders that you want to share. Please note down the IP address, you'll need this later. Click on Options


Choose the protocol that you want to use to share your files. In this case I chose SMB (samba). Click on Done.

Now we need to turn on Internet Sharing. As I use bluetooth to connect to my phone for using gpinternet, I chose to share Bluetooth and then chose via 'Airport'.

Now open VM configuration window for Ubuntu Linux. For Network Adapter we need to choose 'Bridged Ethernet' and then 'Airport/Wireless Adapter'.


Now fire up your Ubuntu VM, when desktop emerges, from the Network Applet in the top right corner of the screen, choose 'Wired Connection'. It will automatically configure the new network.

Now open a nautilus windows and type the IP address that you noted down in the address bar. In my case I had to write down this: smb//10.65.23.158. Shared folders from Mac account will appear right away.

Got myself A MacBook


I bought an Apple MacBook (white) a couple of days ago. My mom gave it me as an early birthday present. :) Love you mom!

Saturday, November 10, 2007

Installing Bengali fonts in Gentoo

Here is how you can install Bengali fonts in Gentoo and its derivatives:

#emerge fonts-indic free-bangla-font

Make sure you have use="X" flag enabled in /etc/make.conf

Back to Blogging

After a failed attempt last year to get back to blogging, I'm trying it again this year. I really wanted to get back, but got busy will...