Hmm, the mission is going pretty well, next step download Monolingual. This cool Open Source tool checks your MacOSX system for redundancies like localized documentations, not platform specific apps and gives you a choice to remove them selectively.
I was able to about 2.8 Gigs from my last run, as I only kept English and Bengali localizations and Intel specific installations.
I love the icon of this app very much, :P
Friday, July 18, 2008


Mission: Recover Disk Space: Part 1
This was getting more and more annoying day by day. My hard drive was getting full day by day as i kept installing new apps but somehow the rate of hard drive usage wasn’t matching the applications installed. Something was wrong and something need to be done.
I installed OmniDiskSweeper and gave it run. I noted a folder called /cores which was taking a whooping 5.4Gigs. Suspicious, I looked it up and came to know that this is the folder where my Leopard keeps its memory dump files after any system crash for debugging purposes. Since it didn’t concern me, I just safely deleted these annoying core.xxxxx files to reclaim my precious 5.4 Gigs.
So if you are also running out of space, don’t forget to check that folder.
I installed OmniDiskSweeper and gave it run. I noted a folder called /cores which was taking a whooping 5.4Gigs. Suspicious, I looked it up and came to know that this is the folder where my Leopard keeps its memory dump files after any system crash for debugging purposes. Since it didn’t concern me, I just safely deleted these annoying core.xxxxx files to reclaim my precious 5.4 Gigs.
So if you are also running out of space, don’t forget to check that folder.
Thursday, July 03, 2008
Debug PHP scripts in Netbeans IDE
Are you having problems in finding pesky quirks in your PHP scripts and swelling your fingers by writing print_r in almost every lines? This tip is just for you ...
Happy Debugging!!!
Update 5 July 2008:
Just found out this link for configuring xdebug with netbeans in Ubunutu 8.04.
- Download and install “Early Access for PHP” bundle of Netbeans from http://download.netbeans.org/netbeans/6.1/final/ .
- Download and install an appropriate PHP-Mysql distro. I’m using MAMP in my Mac OS. Another good platform independent option is XAMPP.
- Download the appropriate version of xdebug from http://www.xdebug.org/ matching your php version (use phpinfo() in your web server to grab that). In my case there was no Mac OS binary, so I had to download the source. If you are downloading binary package then you can skip to step 7.
- Unpack the source and open a terminal in that folder.
- Now run [Note: make sure phpize and php-config is in your path]:
$phpize

$./configure --enable-xdebug

$make- A file called xdebug.so (in Linux and Mac OS) or xdebug.dll (Widows) will get created. If you have downloaded binary package, your package will contain this file.
- Now copy this file into the extension folder of your server. In my case it was like this
$cp modules/xdebug.so
/Applications/MAMP/bin/php5/lib/php/extensions- Now open your php.ini file and add entries for this new extension
zend_extension = "/Applications/MAMP/bin/php5/lib/php/extensions/xdebug.so"xdebug.remote_enable=1 - Now fire-up Netbeans and create/open your php project. Now insert a breakpoint by clicking anywhere in the left margin, now try to debug the file by selecting debug from context menu. You should see your web browser being fired and probably a blank web page. Now press F7 to step into your code and see it execute step by step. Try adding some watches. As the whole page finishes executing, you get to see the result in your web browser.
Happy Debugging!!!
Update 5 July 2008:
Just found out this link for configuring xdebug with netbeans in Ubunutu 8.04.
Sunday, June 08, 2008
FlazX eBook search plugin for Mozilla Firefox
Flazx.com is one of the best sites that I have come across for free e-Book download. With its huge collection of e-Books it never disappointed me.
Here is a plug-in I made for myself to make my search of e-Books easier. Just paste this file in any of the following folders:
/Applications/Firefox.app/Contents/MacOS/searchplugins (in MacOS)
/usr/lib/firefox-addons/searchplugins (in Linux)
C:\Program Files\Mozilla Firefox\searchplugins (in Windows)
Now when your restart your Firefox, you can see an extra search option in your search bar. Select that and search for the e-Book you want.
Note: There has been allegations that Flazx.com infringes copyright laws by making unauthorized copies of e-Books available online. I’m not responsible any inconveniences you may experience while browsing this site.
Here is a plug-in I made for myself to make my search of e-Books easier. Just paste this file in any of the following folders:
/Applications/Firefox.app/Contents/MacOS/searchplugins (in MacOS)
/usr/lib/firefox-addons/searchplugins (in Linux)
C:\Program Files\Mozilla Firefox\searchplugins (in Windows)
Now when your restart your Firefox, you can see an extra search option in your search bar. Select that and search for the e-Book you want.
Note: There has been allegations that Flazx.com infringes copyright laws by making unauthorized copies of e-Books available online. I’m not responsible any inconveniences you may experience while browsing this site.
Wednesday, May 14, 2008
Tips: Backup Phone's Addressboook Online
If your phone supports SyncML you can use any of the online Sync Service to make a backup of your phone's address book, emails, SMS and other contents. There are a decent number of these type of service providers out there. Both paid and free.
Currently I am using myFunambol which is a free service based on Funambol open source software. Though its still in its beta state, its ease of use and features really impressed me. With its help you can keep your phone and outlook contacts in tune all the time.
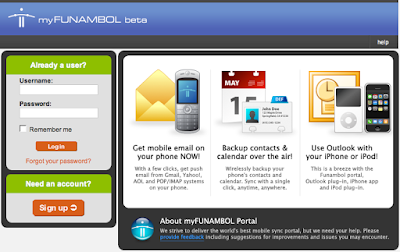
Here is a screen-shot of the login page. After registration, you will go through some well guided wizards that will help you to set-up your phone with Funambol in no time.
Some other good sync service are GSMSync and Scheduleworld. Both of them are also free service. Scheduleworld can also integrate with Google calender.
Currently I am using myFunambol which is a free service based on Funambol open source software. Though its still in its beta state, its ease of use and features really impressed me. With its help you can keep your phone and outlook contacts in tune all the time.

Here is a screen-shot of the login page. After registration, you will go through some well guided wizards that will help you to set-up your phone with Funambol in no time.
Some other good sync service are GSMSync and Scheduleworld. Both of them are also free service. Scheduleworld can also integrate with Google calender.
Tuesday, May 13, 2008
Nokia 3110c iSync plug-in: Part 1
Here is an iSync plug-in that I have made for my Nokia 3110c.
You can download it form here.
Just unzip the file and paste it inside
I made this plug-in by editing Nokia 6102's existing plug-in. So you will need to delete
I am trying to build one from scratch, hope to finish that soon.
Here you can see the working status of this plug-in.

You can download it form here.
Just unzip the file and paste it inside
/Applications/iSync.app/Contents/PlugIns/AppleneConduit.syncdevice/Contents/PlugIns/I made this plug-in by editing Nokia 6102's existing plug-in. So you will need to delete
Nokia-6102.phoneplugin file before pasting this file into that folder, because it conflicts with that phones plugin.I am trying to build one from scratch, hope to finish that soon.
Here you can see the working status of this plug-in.

Wednesday, May 07, 2008
EDGE/GPRS in Leopard
Here I'm going to show you how I configured my Nokia 3110c Phone as a EDGE modem with my MacBook in Leopard (10.5.2).
Go to System Preferences > Network. Click on the Bluetooth section, initially it will be empty.
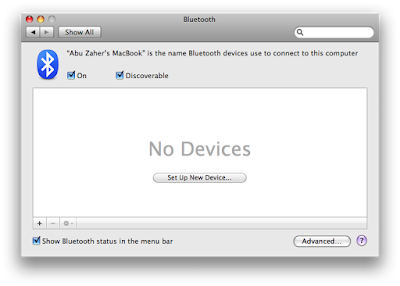
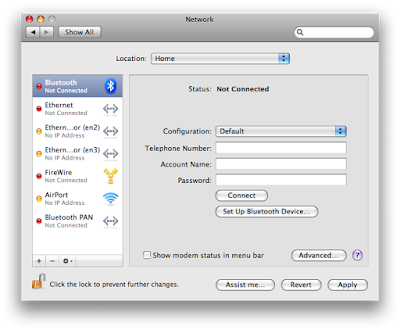 Select Setup Bluetooth Devices. In the new window, select Set Up New Devices.
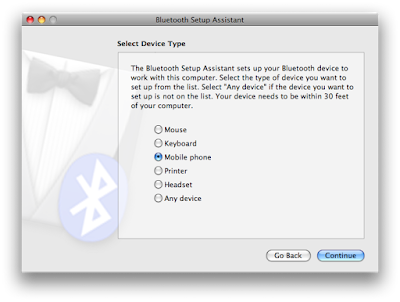
 In th Device type, select Mobile phone.
 Bluetooth Setup Assistant will try to find your mobile phone, be sure to turn on Bluetooth on your mobile phone too. After your phone gets detected, select it and press continue.
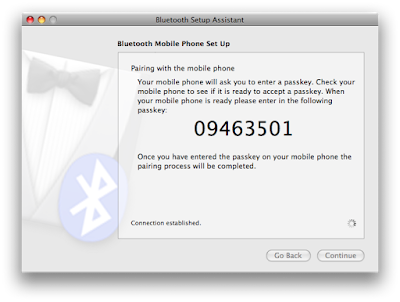
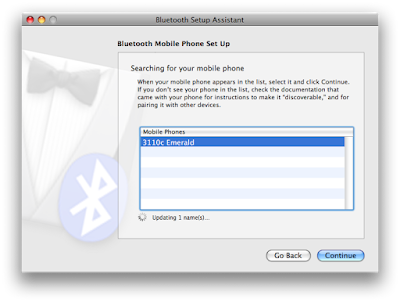 Insert the paring key in your mobile phone.
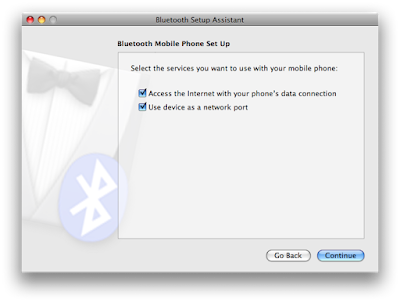
 Be sure to check the two boxes in the next section.
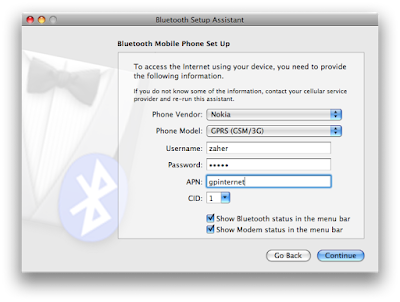
 Now comes the modem setup for your phone. I chose Nokia from Phone Vendor, and GPRS from Phone Model, and in the APN section gpinternet. You can put any username and password in their respected field. Check all the other options as described in the picture.
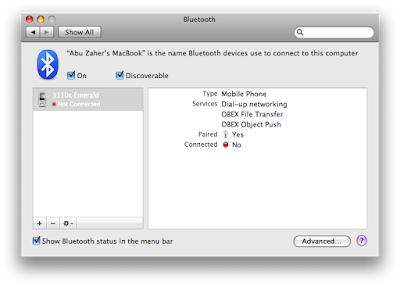
 If everything goes well, you should be seeing a new entry in Bluetooth section in System Preferences.
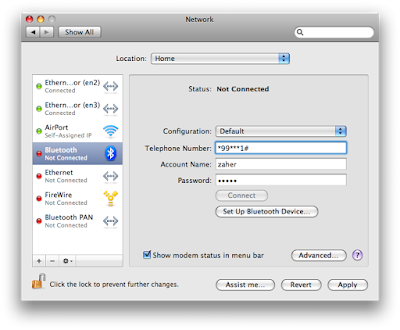
 Now we go back to Network section and again select Bluetooth from the left pane. In the Telephone Number field put *99***#. And provide the previous Account name and password. After clicking on the apply button, just click on connect and keep your fingers crossed.
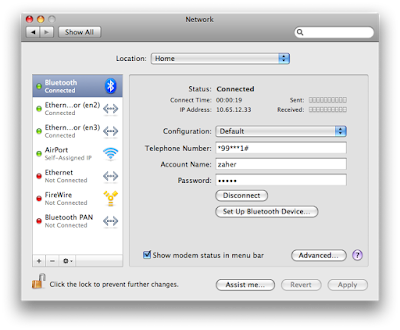
 It won't take more than a couple of seconds to establish a connection. You should see Status: Connected by now.
 You can connect to this EDGE/GPRS modem from the menu bar directly from now on. Just Click on the Phone Icon in the menu bar and then click connect.
Go to System Preferences > Network. Click on the Bluetooth section, initially it will be empty.
 Select Setup Bluetooth Devices. In the new window, select Set Up New Devices.
 In th Device type, select Mobile phone.
 Bluetooth Setup Assistant will try to find your mobile phone, be sure to turn on Bluetooth on your mobile phone too. After your phone gets detected, select it and press continue.
 Insert the paring key in your mobile phone.
 Be sure to check the two boxes in the next section.
 Now comes the modem setup for your phone. I chose Nokia from Phone Vendor, and GPRS from Phone Model, and in the APN section gpinternet. You can put any username and password in their respected field. Check all the other options as described in the picture.
 If everything goes well, you should be seeing a new entry in Bluetooth section in System Preferences.
 Now we go back to Network section and again select Bluetooth from the left pane. In the Telephone Number field put *99***#. And provide the previous Account name and password. After clicking on the apply button, just click on connect and keep your fingers crossed.
 It won't take more than a couple of seconds to establish a connection. You should see Status: Connected by now.
 You can connect to this EDGE/GPRS modem from the menu bar directly from now on. Just Click on the Phone Icon in the menu bar and then click connect.
Subscribe to:
Posts (Atom)